A Cute Pink DIY 18 Inch Doll Closet

Back when we celebrated my daughter's 9th birthday one of the presents I really wanted to give her was a doll closet to hold all of the doll clothes that she was slowly amassing for her trio of 18 inch dolls. I decided that making her one might be a better idea after not being able to find something I liked and checking the prices. And not only that but it fit with my tradition of making her something each year for her birthday.
Each year I like to make my daughter something special for her birthday. Something that I make by hand in some creative way. Some past items I made for her included felt toys or a quiet book. My husband likes to call it Folk Art and says it will be worth a fortune in the future (this is us watching too much Antique Roadshow).
Her dolls, named Dolly Washington, Meef, Sofia, and Samantha needed some new digs for their outfits so Momma (that's me) came to the rescue.
The Decision to Create a DIY a Doll Closet
I actually didn't have a plan in place on how to make this doll closet. I had seen several in person and online. And growing up I played with one but how to actually make one? No idea.
The idea came to me all of a sudden while I was out shopping.
One day, as I was wandering through our local craft store, I saw a sale on unfinished toy chests. I stood there a moment looking at them. I had no need for a toy chest but then I had an aha! moment and I decided right then and there I would make her one. Or at least put one together with crafty items. I wanted to be crafty!
I have a DIYer in me struggling to get out but I'm one of those who will have more Oops! than successes. Nevertheless I still muster on and tackle one tiny project at a time.
This time it was coming up with my own version of a Doll Closet for my daughter.
My mother used to make doll furniture for me out of cardboard when I was little but then she does have a degree in fine art. That gene seems to have skipped a generation…or two.
How to Make a doll closet Out of a Box
Supplies for the Doll Closet
This is the list of things I purchased to make the doll closet. The first item is an Unfinished Wooden Toy box I found locally. You can also make the doll closet using a cardboard box with the same dimensions. In fact my mother made another box for her doing just that, but this one was for toys.
- Unfinished Wooden Toy Box measuring 11X10X15 inches
- The store where I purchased the toy box does not sell online, nor have I been able to find something similar online. I'm very sorry about that. I was so sure I could find a resource pointing to this simple toy box but so far no such luck. I'll keep checking though and in the meantime check your local craft store. The toy box at the time was $11 on sale.
- Colorful Scrapbooking Papers
- Acrylic Paints in Pinks and White
- Modge Podge
- Little Unfinished Wooden Balls
- Small piece of plywood or shelf
- Cut metal rod for hanging rod.
Steps to Creating a Doll Closet
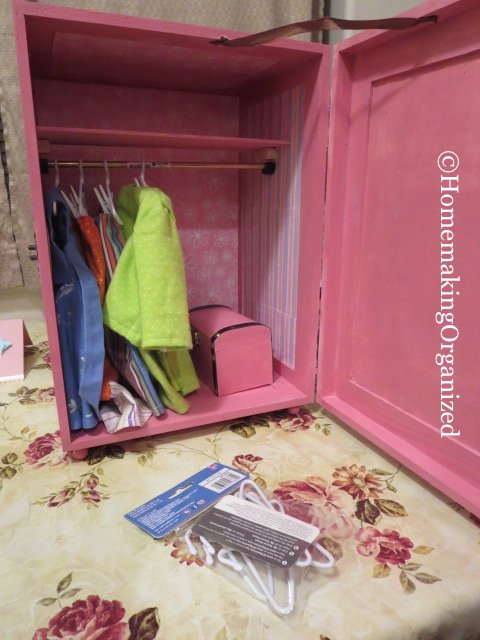
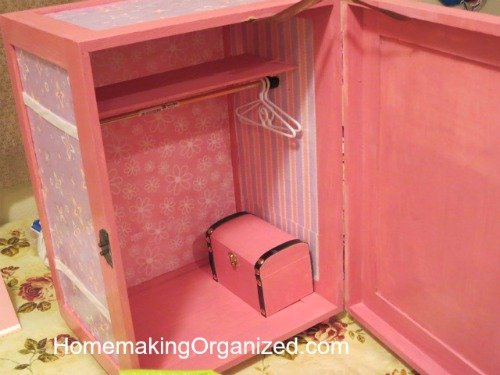
Step 1 : I painted the chest with pink acrylic paint. I painted both inside and outside. But I only painted the edges because I was using scrapbooking paper on the panels.
Step 2: Next I used the Modge Podge to add the scrapbooking paper to the panels. The paper wasn't big enough to cover a section in one sheet so it's cut and patched in places. That's the beauty of Modge Podge, it glued things in place wonderfully. I added the paper both inside and outside.

Next I added some cloth binding strips (instead of ribbon) to the parts where the paper is patched. You can find these in a sewing store such as Joanne's. I ran through different ideas in my head but I was kind of trying to be a bit frugal with this project since we were buying her a few other gifts.
After the paper, paint, and added strips had dried I covered it all with a few coats of Modge Podge.

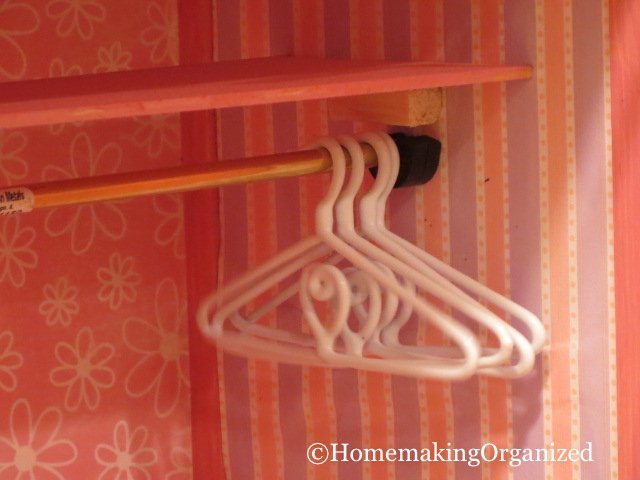
Step 3: Then my husband added a hanger bar for me. I had purchased some wooden dowel rods but he purchased a little metal one. He wanted it to have some panache. I'm not sure how he cut it. We used little rubber feet on the ends to keep it in place.
Step 4: We added a little shelf above the rod (with glue). I painted it pink and Modge Podged that also.
Step 5: I picked up a little tiny chest unfinished wood chest (from the same craft store) that I also painted pink and Modge Podged. And then I painted and Modge Podged some wooden knobs that we added to the bottom for feet (again from the same craft store).
We haven't added the handle yet but it's in full use.
It came out rather cute dontcha think?
What would I do differently if I had to do it again?
- I like how the Doll Closet came out. To use a toy chest was a spur of the moment idea and it worked out well (not all do you know).
- Some things I would change?
- I should have primed it before painting. You can see how the paint didn't cover evenly. I'm a novice painter so forgive me that.
- I think I should have purchased scrapbook paper panels specifically for this chest instead of trying to use what I had in the house. Frugal thinking but lots of frustration in trying to match the colors with sometimes not enough paper.
- Then I also think I would cover the panels with something else. I thought about fabric but couldn't think of how to add it neatly and nicely….Modge Podge!
Just a few things I learned from this tiny project.
More Doll Stuff
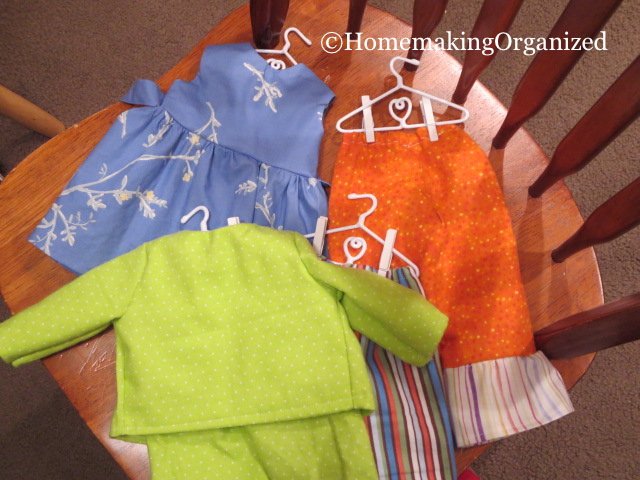
In addition to the chest I whipped up some doll clothes from various patterns I had on hand and that I found on the internet. If you remember we did a Homeschool Review on Rosie's Doll Clothes last year. That info helped me to forge ahead with these tiny clothes. So quick and easy to make. I have a few more cut out but I'm waiting until I move into my new craft room.
My DOll Closet DIY Resources:
- Unfinished Toy Chest, Paint, papers, and modge podge: Craft Warehouse
- Doll Clothes Patterns and tips for sewing tiny clothes easily: Rosie's Doll Clothes Patterns
- I have an older version of this Janome Computerized Sewing Machine
- 18 Inch Doll House Plans on Etsy
- 18 Inch Doll Houses on Etsy

Where did you purchase the clothes hangers? I love the closet.
Awsome, thank u so much for sharing ur ideas! My daughter is 7yrs old and loves changing out the dolls clothes every 20mins and i need somewhere to store these clothes for one so they dont get lost and 2. B/C They are expensive. I was wondering if u knew any links for any other american doll things that I could do my self… such as a bed out of pastic crates or bins or take her old dresser draws and do something with the dresser or the draws..lol i have no idea but i want to try to be creative and use the things we have around that we no longer use. I am really crafty Any help or thoughts appreciated. I saw,a few links but didn’t kno if u knew specifically about and old dresser and the draws …thanks hope to hear from you. You rock!!!! -crystal
I made one from box I found at Michaels..used many of your ideas..thank you for posting! I posted my trunk also..
Mary I would love to see your Doll Closet! . Do you have a link ?
I love it Kemi! We have made one out of a cardboard box but it is nowhere near this cute. Great job.
Aw thanks Lori. It had to be God. I walked past them and the lightbulb turned. I’m sure there was little bulb above my head.
I must know where you found the box, my daughter is begging to make one 🙂
I guess I should have taken a picture of what it first looked like. It’s actually a small toy chest. We have a craft store called Craft Warehouse and they were on sale for $11. I didn’t see them at Joann’s but maybe a Michael’s or Hobby Lobby might have one. I can’t seem to find them online but if I do I will link them. Thanks so much for your comment Beth 🙂
There are so many thoughtful details in this. Thanks for sharing step by step how you completed it. My girls are inspired to try something similar now.
You’re very welcome 🙂